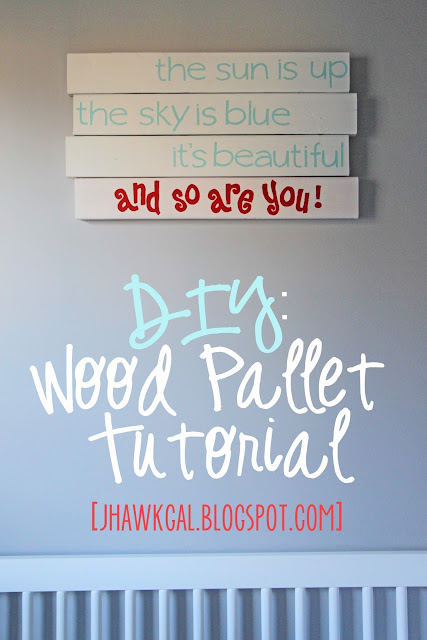
DIY: Wood Pallet Art Tutorial
Oh how I've missed you all! Truth be told, my extended absence [longer than a week, anyway] is due to laziness.
That's pretty much it.
I had a lot of pictures to edit and I've grown tired of the amount of photographs I've taken. The editing process is exhausting, especially if you're a psycho like me who spends way too long on the average photo-editing process.
Anywho, as promised, I wanted to feature my latest DIY project! I've gone a bit stale in the project department mostly because I was tired of it all. And I kind of ran out of ideas.
But when we found out we were having a girl, the nursery planning could finally begin!
I stuck with the Beatles theme because...well, because the Beatles are awesome. I found two old concert posters from an awesome shop in Estes Park when we were there a few months ago that will also adorn the wall that this piece will hang from. This particular quote is from "Dear Prudence," one of my favorite Beatles tunes.
Originally I was going to just buy one on Etsy because I was too lazy to do one myself, but those Etsy finds are a tad bit expensive! So last weekend I got in the nursery-decorating mood and decided just to do it myself. I googled the process and it seemed easy enough. And it would probably only take a couple of hours to complete. [ha!]
...
......
.........
Let's start from the beginning.
Matt and I went to Menard's to grab a few things for the nursery that we needed, so I picked up an 8' 2x4. It was uncut, but I asked the hubs [in the sweetest voice I could muster] if he would cut it for me. He dutifully rolled his eyes and agreed. :)
He cut the 8' board into 4 2' 2x4's.
Sanding really wasn't needed because I was picky about the board I picked out in the first place. Plus I wanted a rugged look. If that's not your thing, you can sand and wipe it down with a damp cloth or cheese cloth if you don't find a nice piece of wood.
Pre-plan whatever colors you want. Adelaide's crib & dresser are white and the walls are a simple gray color, so I wanted the main color of the boards to be white with red & light blue wording.
Paint each board first with the color you want your lettering to be. I did a heavy first coat, so I didn't need two coats on these. I used a simple acrylic paint for each color.
Stick them in a room where you can have a ceiling fan, or if you're not impatient like I am, you can just let them dry naturally. I'd recommend laying newspaper down on the floor before doing any paint work[learned that one the hard way].

While those are drying, you can start on the letters. I pre-printed my letters via photoshop. My process for this was to make a file that was 24x16 inches in size [GIANT FILE], indicate lines at 4 inches [to represent boards], fill in with the font type & size that looked good for each board, and then transfer however it would fit into multiple 8.5x11 files. This seems like a long process, but I have a regular printer, not a magic one, so it was really my only option.
Once you've figured out how to actually print the giant letters, cut out pieces of clear sticky paper that will fit your wording. Using an exacto knife, cut out each letter.
Lay out each letter on the board [with the backing still on the sticky side...you don't want to screw it up just yet!] the way you'll want it to sit.
Peel & stick each letter to the board. Make sure you get those suckers stuck real good; odds are the top coat of paint is going to infiltrate anyway, but give it your best shot.
I don't have a picture of this step because I have ADD when I'm doing projects and I totallly forget to document each step with a photo. But it's easily explained:
Spread your white paint [or whatever color you chose for your background/main color] over the letters & wood. I used a sample size of acrylic indoor/outdoor white paint from Wal-Mart, but that was a real pain in the ass. It wasn't as thick as I'd have liked, so I recommend a simple white acrylic paint from HL. Be sure to get the edges and top or bottom of the boards, depending on which board will be where on the finished product. I used a cheap foam paint brush, but I have this thought that a tiny roller might work better. That was just one more cost to add to the project and I had a package of 50 foam brushes lying around, so I just decided to use that.
This wasn't a smooth process and took approximately 5 coats per board, but I don't recommend any fewer coats than that. I still don't think I did enough coats on the red one, but it's too late now. This damn thing took way too long as it was, I sure as hell wasn't going to start again on another board.
After you're satisfied with the number of coats you've used, use your exacto knife to remove the stick-on letters. You might flip out a little if you find your letters looking like this along the way:
or if the white paint peels in certain places. I avoided this on my second-fourth boards by not letting the paint dry completely so I could peel the paint back down if it started coming up when I peeled. If your letters do end up like mine, just use a tiny brush to touch up.
Repeat this process for all of your boards.
Odds are by the end of it you'll have carpal tunnel in your hands and also, you'll want to light all of the boards on fire.
I finally finished 4 days later, working on it for a few hours each night when I got home from work.
The last day consisted of securing all of the boards into one piece.
My husband recommended using these little bridges we found at Menard's. We got 6 - 2 for each seam, plus some 1 1/4" screws to put them in place. We also got two sturdy hangers to screw in the back for hanging it on the wall.
I had to beg my husband once again to put it on the wall. And I'll let you in on a little secret - this thing is HEAVY.
Use caution when you're hanging it and please, for the love of all that is good in this world, have your husband/local handyman find STUDS to secure it to.
If it falls down and gets hurt, I will sob uncontrollably because this project involved a lot of blood, sweat and tears.
I now know why they're so expensive on Etsy.
So there you have it! Finished, I think it's absolutely wonderful and will add a touch of something unique to Addi's room.
Things I'd do differently:
Find a thinner board. You don't need a 2x4. Find a board that is much, much thinner. This will eliminate a lot of the weight.
Things you could do differently:
You could just paint the entire board white and if you've got a super-steady hand, paint the letters freehand. I, however, do not acquire such skills. I do think I could've found a quicker way to do it, but it's done now so I'm not going to torture myself by lingering on that possibility.
Let me know your thoughts or suggestions in the comments section or on my Facebook Page and I will add them to the list.
I've got a few other cute tutorials coming up, so hold on to your hats!
Or...pants.
A lot of people don't wear hats.


Comments
Post a Comment
Thoughts? Love to hear 'em.